The BEST Buttermilk Biscuits you ever will eat!

I said it! I really did! And if you make these biscuits you will have to agree with me. These are 100% the best buttermilk biscuits you ever will eat whether you make them vegan, as I did, or not. [Just so you know, if you make these  vegan for a crowd, they will not be able to tell that they are, trust me!]

This is one of those recipes that was passed down from my mother’s best friend’s grandma. Got that? 😉 I would always ask for Robin’s (my mom’s friend) biscuits when she came to spend the weekend with us. One day, when we went down to visit Robin, my mom finally learned how to make them! Oh joyous Saturday morning breakfast from then on!

Everyone kept asking my mom for the recipe to her delicious biscuits, and very graciously, my mom sent out an email that detailed every step of how to make them. So here are the steps, very detailed, in picture form from me! Huh, maybe together my mom and I could be writer/photographer for a step-by-step recipe book =)

So here we are.

The BEST Buttermilk Biscuits you ever will eat:

IMG_5809

What you will need:

  • 2 1/4 cup Soy milk or your choice of milk, just make sure it is capable of being turned into “buttermilk”
  • 2 1/4 Tbs Vinegar,
  • 3 1/2 cup flour +extra for the counter,
  • 4 3/4 tsp Baking Powder
  • 1 3/4 tsp salt
  • 1 Tbs sugar
  • 1 cup Crisco
  • 1/2 cup Earth Balance or choice of butter option

– Mix the soy milk and the vinegar, whisk well and set to the side (curls to form a buttermilk)

IMG_5811 A

Place butter in a 13X9 pan then place the pan in the oven as it heats up to 375. But remember to take it out after about 5 minutes, it’s just so the butter can melt. Set the pan to the side.

IMG_5811

Now, you can use a self rising flour, but I don’t have any. It is very easy to make your own, which is what I did in this recipe.

IMG_5814

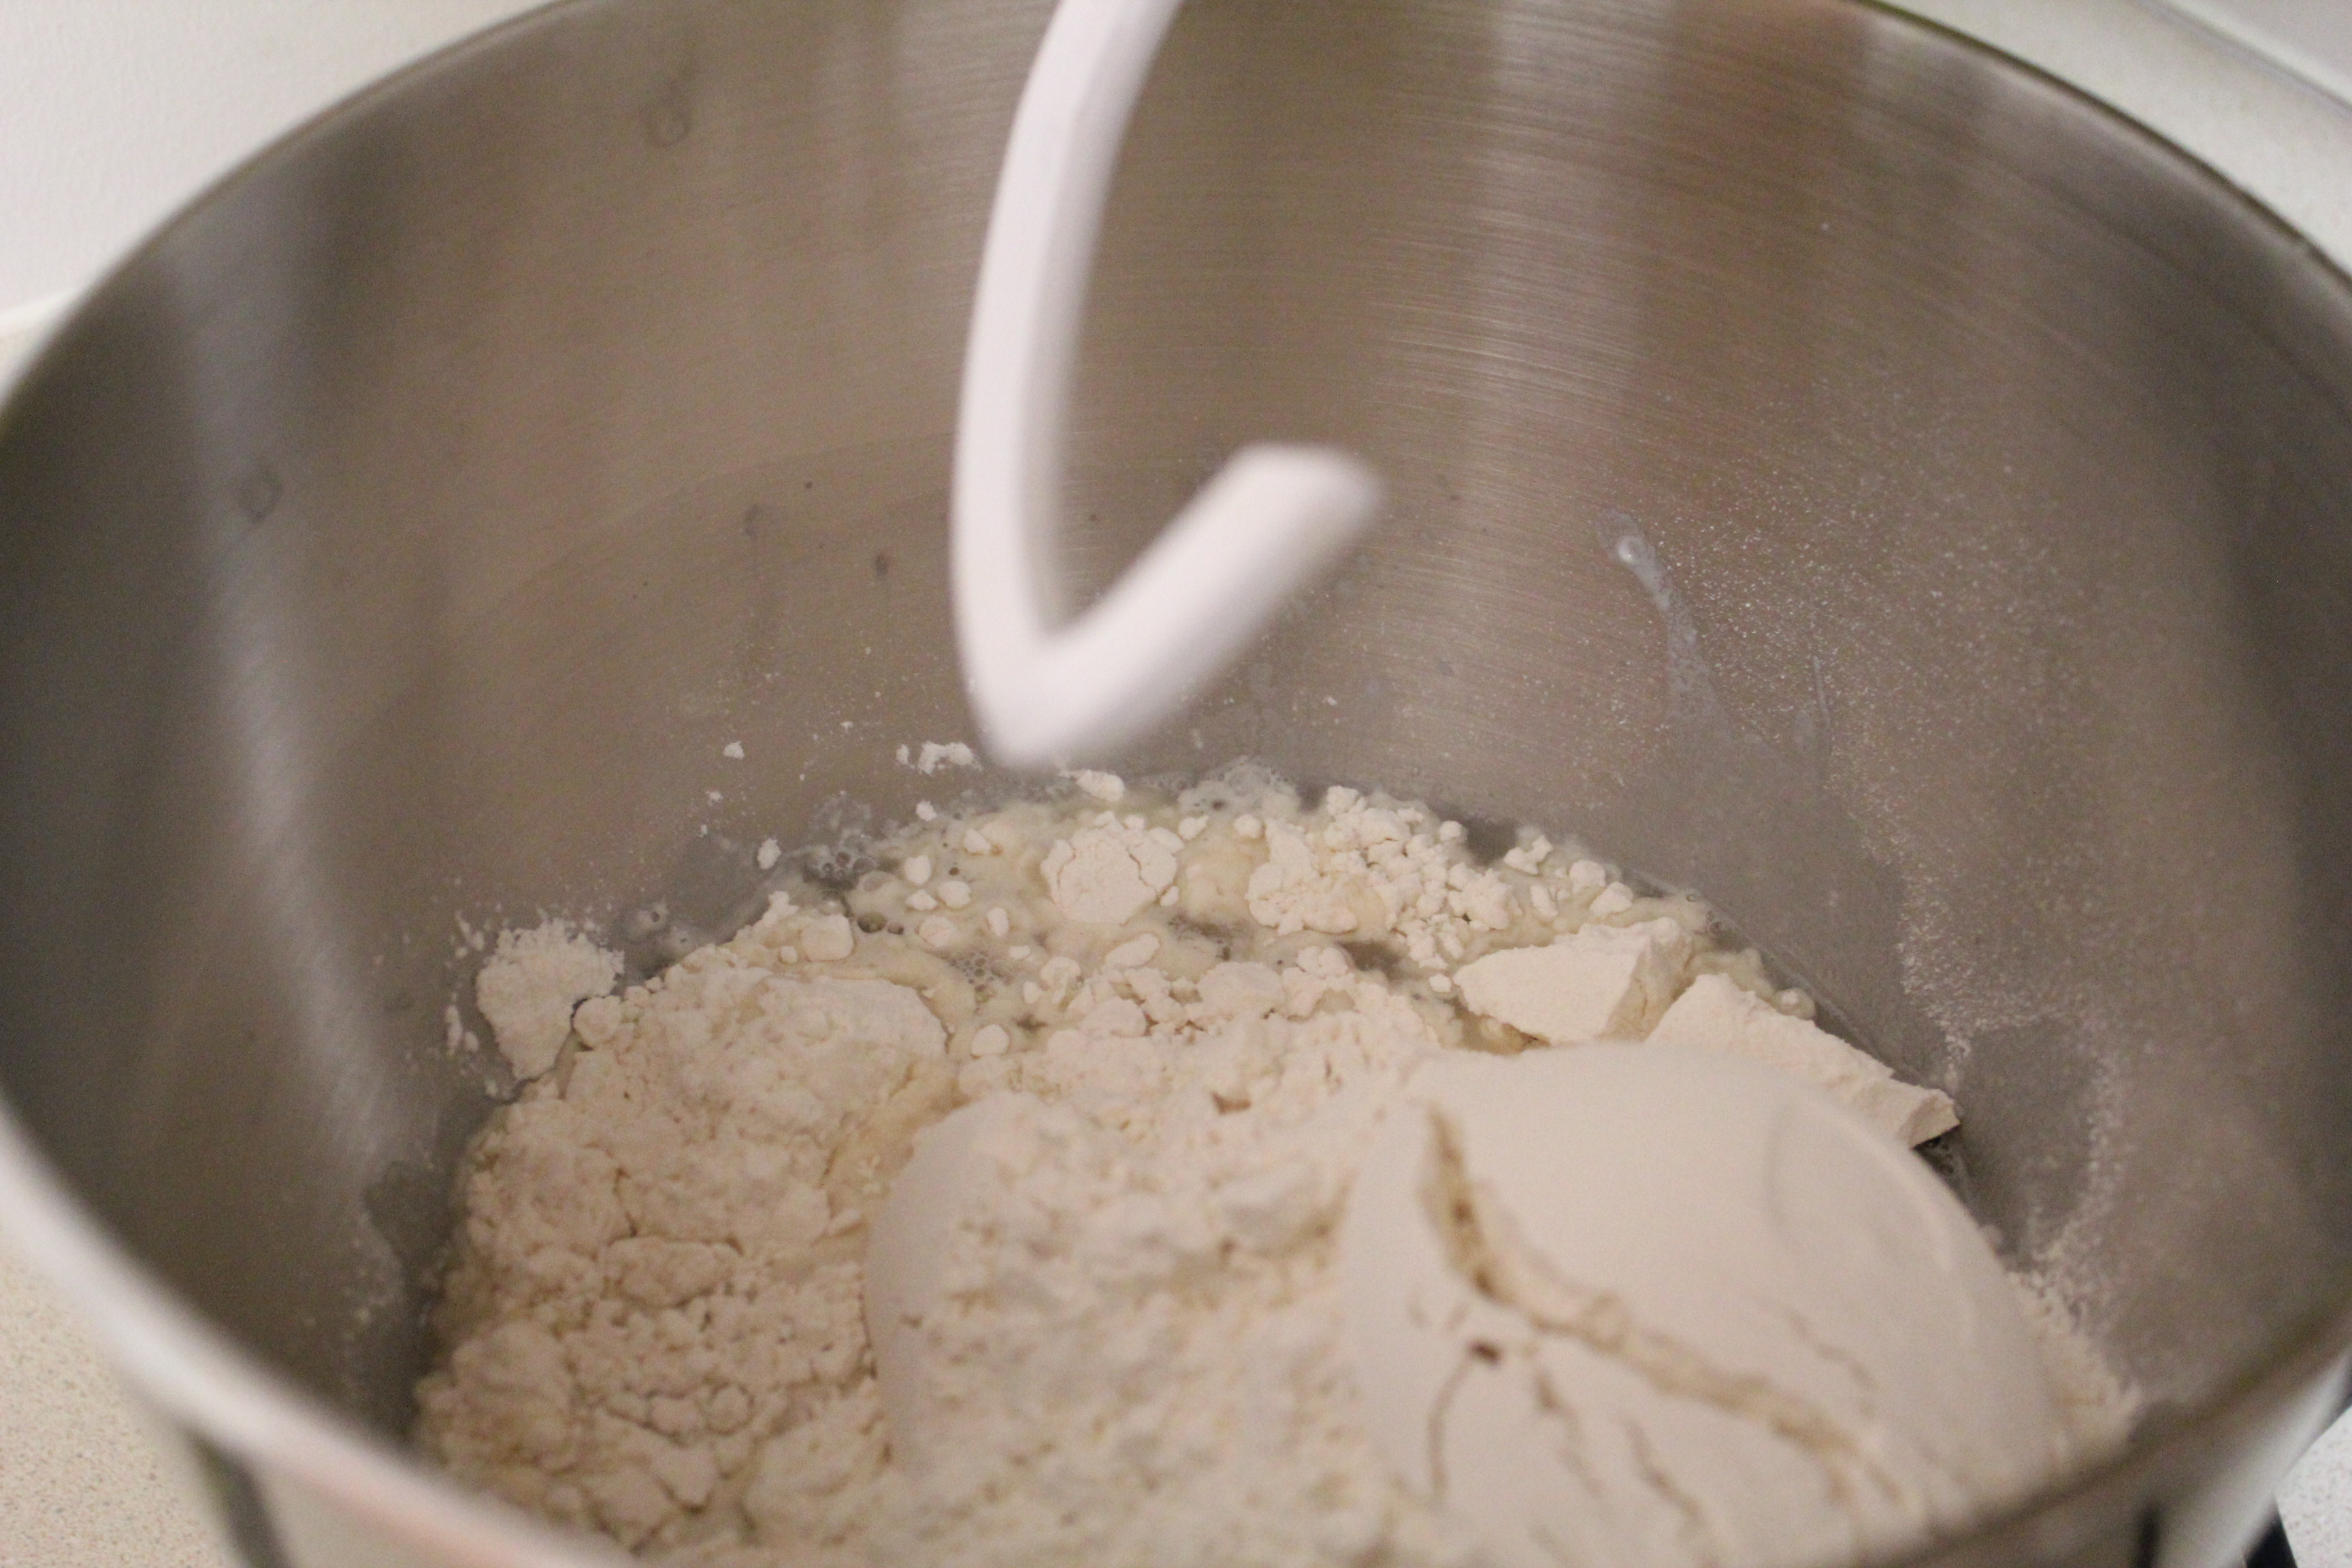
Mix your flour, baking powder, salt, and sugar together.

IMG_5816

Next, what you will need is a pastry cutter, or fork and knife if you don’t have one.

IMG_5818

Cut the Crisco into the flour mixture. Lumps are OKAY! Just make sure you get to the very bottom of the flour mixture as well.

IMG_5819

Make a “well” in the center of your flour mixture.

IMG_5821

Pour your “buttermilk” into the center of the well.

IMG_5823

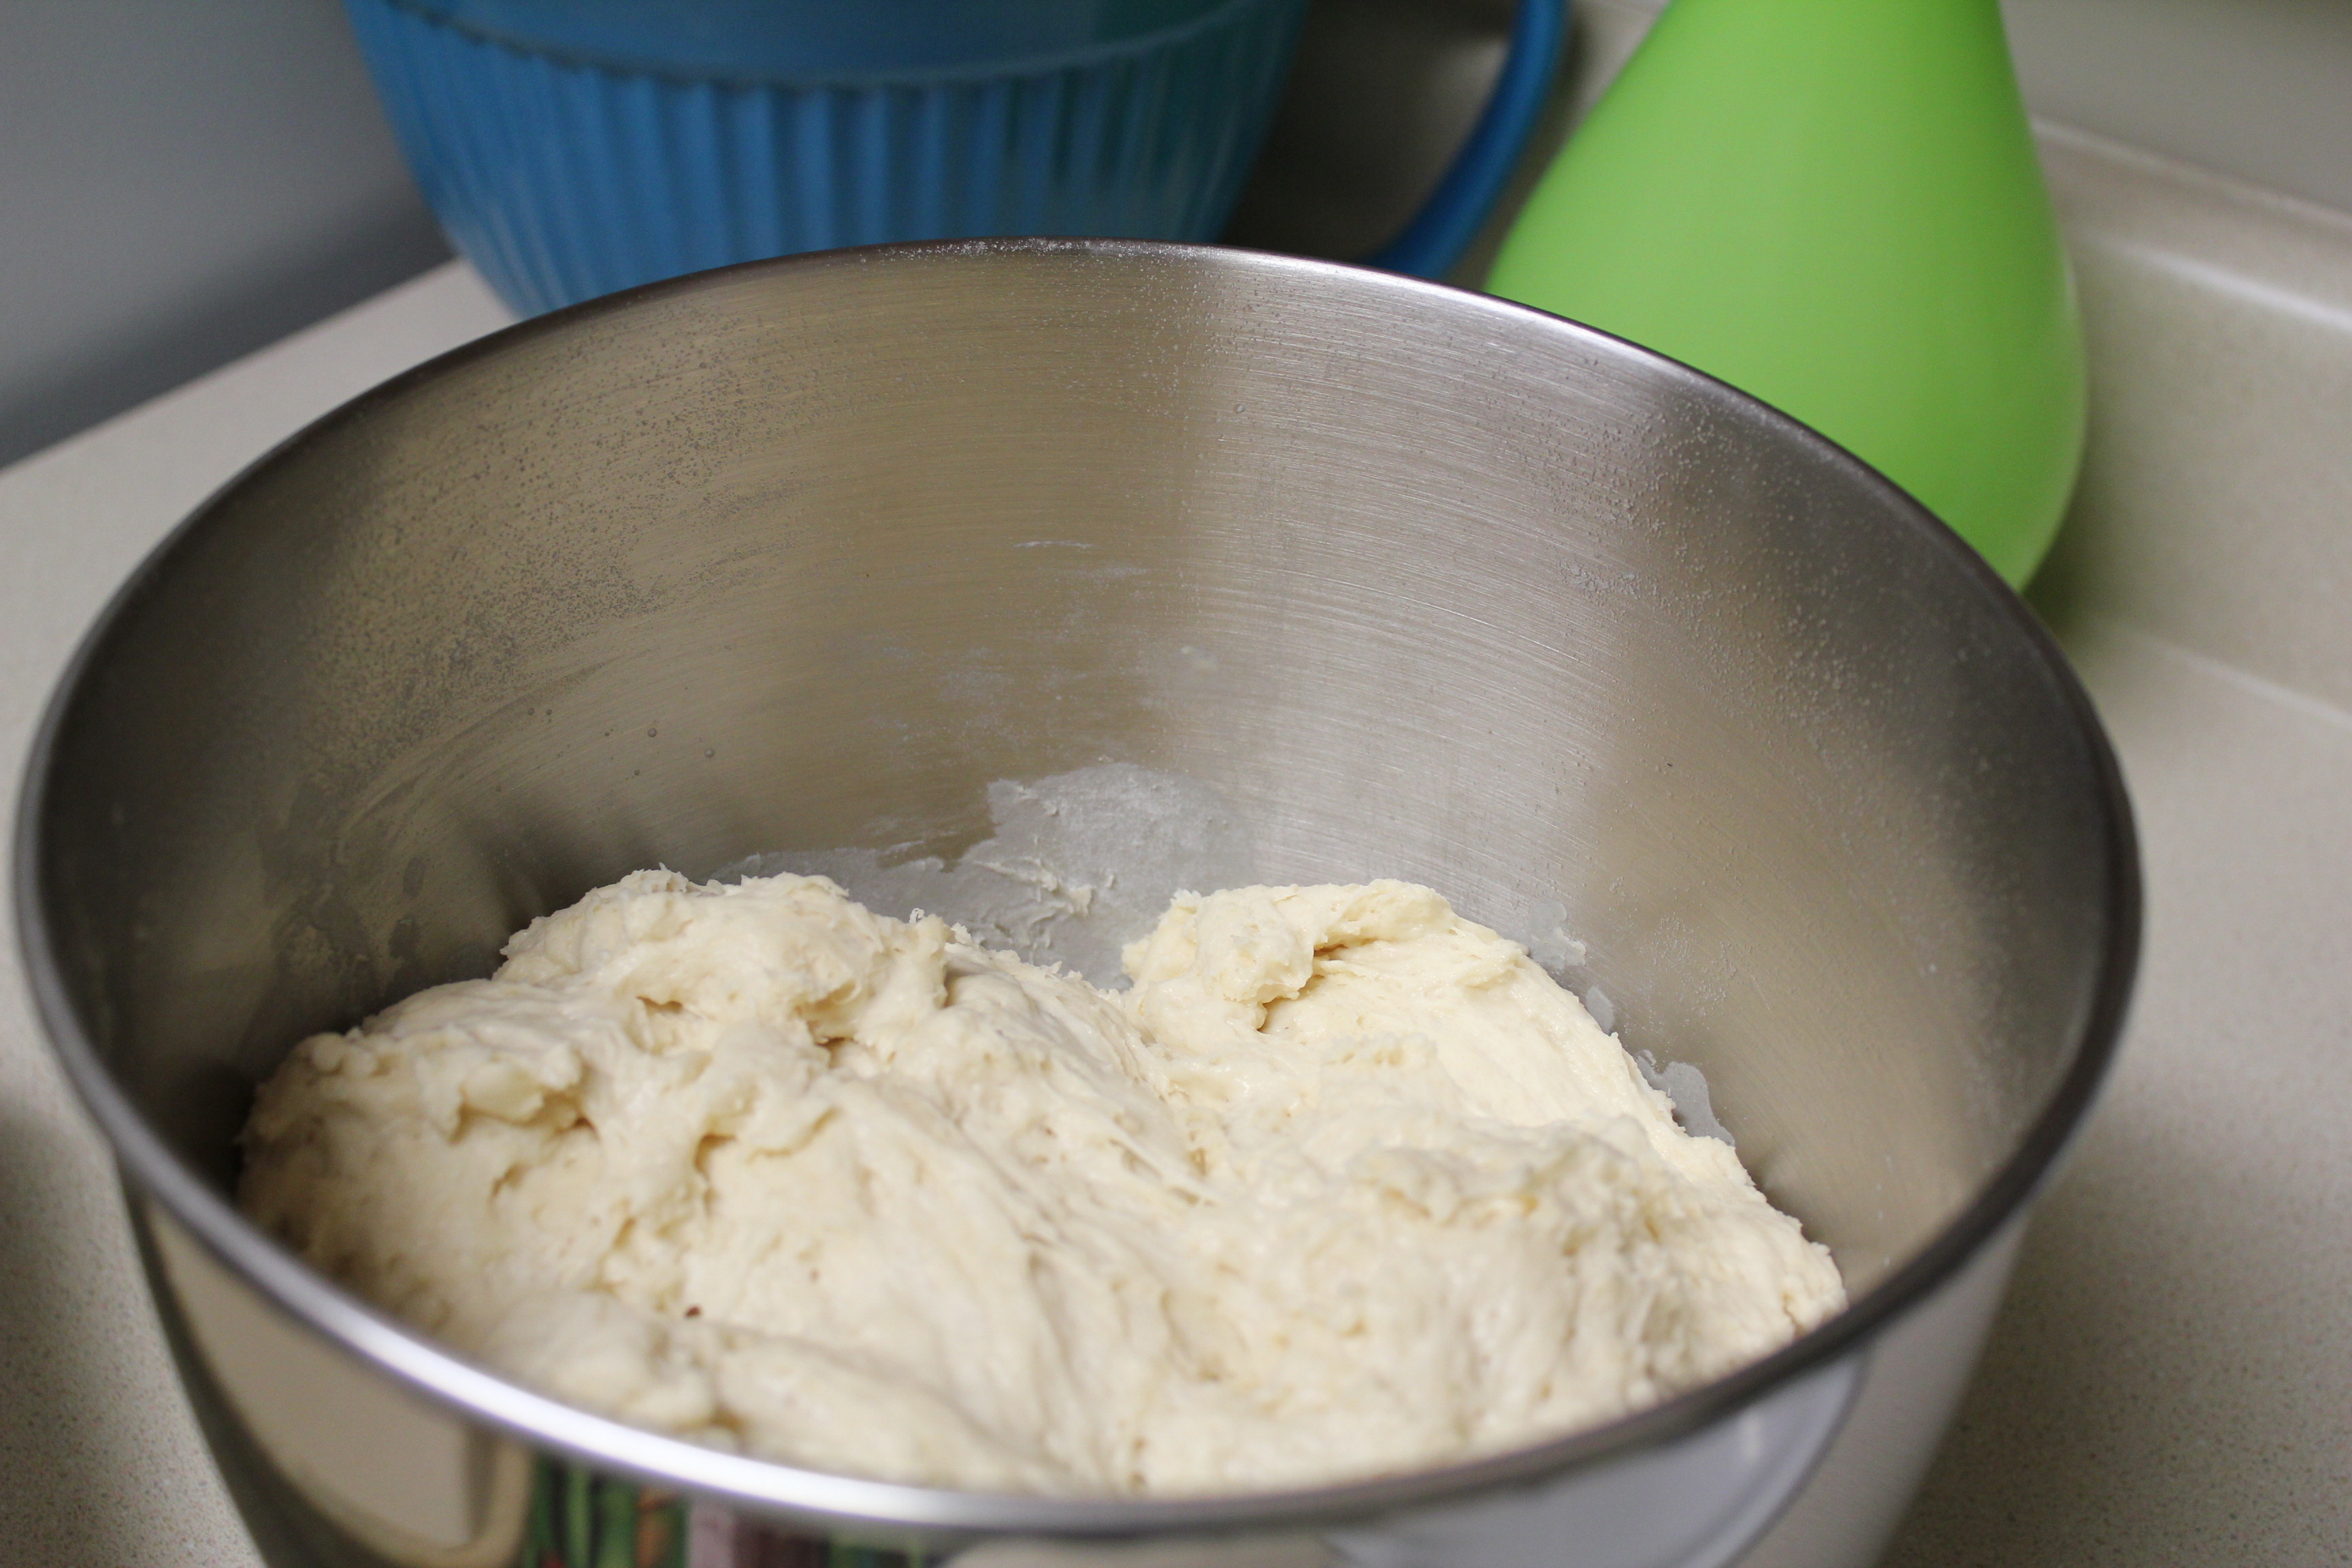
Slowly take a spoon and drag the flour from the edge through the center to the other edge. Just until the wet has cut through all the dry. Don’t over do it so your biscuits will be fluffy!

IMG_5824

Prepare a floured surface.

IMG_5825

Push dough out into the shape of a 13×9 pan with your fingers. (make sure your hands are VERY well floured)

IMG_5829

Slip your well floured hand underneath one side, flip it to the center. Repeat with other three sides.

*note. The dough is supposed to be really wet. Don’t think you have done something wrong or forgot an ingredient

IMG_5830

Press the dough back out into a 13×9 shape again.

IMG_5831

Using a biscuit cutter, or what ever circle cutter you have, use all the dough to cut 15 circles.

IMG_5832

As you are placing your cut biscuits into the melted butter pan, flip them in the butter to coat the top and bottom.

IMG_5835

Bake them in the 375degree oven for 15 minutes, rotate the pan and bake them for an additional 8-11 minutes. Just watch them to make sure they won’t burn.

IMG_5841

And enjoy! Here I have them with my momma’s homemade strawberry jam. Let’s just say that right after the photo was taken, my subjects quickly disappeared 😉

Hope you enjoy them as much as we do! Makes breakfast for dinner amazing!!!!

Caroline’s First Birthday ~ Chic with a hint of shabby ~

Well, I do believe it has been forever since I last post, but maybe this blog will let you see what I have been doing.

My baby girl turned 1 year old this past Sunday, yes she is a Saint Patrick’s Day baby. Of course I can’t do anything for her small. So what did I do? I took about 3 solid weeks and crafted until 1 or 2 am sometimes, then at the end, all I did was bake and cook and mix things up for food. Trust me, we did not lack in the food department as you will see.

Okay, here are some pictures! (Most of the photos were taken by my sister, Hannah)

My baby girl’s big day:

IMG_0977 - Copy

I took a few photos the night before, thus the empty beverage dispensers.

IMG_0978 - Copy

Instead of plastic cups, I did what every one seems to be doing now and used mason jars with ribbon!

IMG_4406 - Copy

A simple ribbon tied at the top of the dispensers with the label on the front was simple yet elegant.

IMG_4416 - Copy

A coffee filtered wreath I made, with a yarn #1 and material flowers, against a strip-torn material backdrop served as an eye-pleasing area for my baby girl to eat her cake.

IMG_4427 - Copy

The food table as we were loading it with the food.

IMG_4430 - Copy

This is above the food table. I used tulle to frame the table and the popular homemade pompom balls.

IMG_4435 - Copy

I made a station that had a poster of all her sizes, and her likes along with a photo album of her 1 year pictures. I had people write a note to her on 4×6 index cards to put after pictures to become a yearly tradition.

IMG_4436 - CopyUsed a $0.95 photo frame from Walmart to class up the explanation sign.

IMG_4438 - Copy

The birthday high-chair!

IMG_4442 - Copy

The birthday girl!

IMG_4446 - Copy

If you know how to sew, please don’t laugh, I did the best I could with the skirt. An explanation of her outfit, I tea-dyed a long sleeved onzie, printed out the graphic on transfer paper, and sewed lace around the sleeves and the collar. I also (never sewed anything before) created a skirt design, in my mind, and somehow got it to work. I don’t have a sewing machine so all of it was done by hand.

IMG_4457 - Copy

Caroline and her Poppop (my dad)

IMG_4460 - Copy

Here is the filled food table! Told you we didn’t have a shortage.

IMG_4461 - Copy

Everything was homemade (except my momma bought whole wheat buns for her delicious contribution of bbq chicken sandwiches). Pictured, we had blueberries, watermelon, blackberries, bbq chicken sandwiches, cucumber tea sandwiches, tuna salad sandwiches,  PB&J for the ones that didn’t like the other options, and bagels and lox (oh, I bought mini bagels, but the lox we did make), and bloomin’ onion bread.IMG_4462 - Copy

Here we have cucumber dill dip and wheat thins (those bought obviously), carrots, cauliflower, sweet peppers, colby jack and mozzarella  cheese blocks, GF Cherry bars, GF/dairy free/egg free  chia lemon loaf, and homemade chocolate cake with butter cream icing.

IMG_4465 - Copy

I am not a cake artist, but I did the best I could. I am a person that prefers pies and my hubby doesn’t like cake, there fore I don’t make many cakes, BUT we both LOVED this cake, and might have even finished the few leftovers for breakfast over the next two days…

IMG_4471 - Copy

Who wants boring ice cubes when you can have berry fizzle ice cubes?

IMG_4473 - Copy

And the complete drink station

IMG_4476 - Copy

Up close of another table decoration. Can you guess how they are made? =)

IMG_4478 - Copy

Gibbs, our munchkin cat, decided he was going to claim one of the chairs.

IMG_4479 - Copy

Caroline with her Mommom (my mom)

IMG_4489

Grandma! (my hubby’s momma)

IMG_4490 - Copy

My sister, Hannah, and me!

IMG_4501 - Copy

Caroline decided she wanted a break from the party, so what did she do? she grabbed a book, went to her favorite spot, and started flipping through the pages and “read” her book!

IMG_4511 - CopyMy hubby with his brothers and the star of the day!

IMG_4629 - Copy

Getting ready for cake!

IMG_4641 - Copy

Birthday girl was so tired! She had just opened well over 20 gifts. Exhausting stuff, when you are only one.

IMG_4695 - Copy

But exhaustion seemed to fall off of her after the first couple of bites.

IMG_4703 - Copy

One messy girl!

IMG_4409

(this should have gone in earlier, but this is the full view of the cake backdrop)

IMG_0974The Happy Birthday Caroline banner. No I’m not rich enough to have a Cricket just yet, so everything was cut out by hand. Took forever, but I like the end results.

We turned our garage into another room for games and had it all decorated too, but forgot to take picture =( But what we had in it was a futon, with more pompoms hanging over it. We had a large wooden spool that they used for power lines, using it as a table, covered in the same material as the beverage table. We used that as the game table which had Sour Apples to Apples, Uno, and Phase 10. I used an old Coca Cola wooden crate and glued bottles in them for a ring around the bottle game. We also had friends bring their Corn Hole game for everyone to play. We were also going to have a fire in the fire pit, but it decided to rain.

IMG_0983

I forgot to take a picture of these before when it was actually full. Since it was mostly adults at the party, I gave out homemade soap, bath salts, and hand sanitizer. This was sitting on a hay bale draped in lace outside the garage, but the rain made it have to come back inside and not look quite a shabby chic.

IMG_0987

Here is the wooden spool (undecorated seeing as how I forgot to take pictures of anything in the garage before or during the party) that we used as the game table. Also showing is the ring around the bottle game.

IMG_0986

We hung a shower curtain and sheers costing a total of $24 to divide the laundry room part of the garage and the party part of the garage. Add a futon with some pillows and some decorations and you have a nice looking “party game” room.

IMG_0985

The sign hanging over the party favors.

Hope you enjoyed viewing all the photos! I had a blast getting all of her party decorations and games together.

Breakfast Bread ~ A sweet, but mostly healthy treat

It has been awhile since I have posted anything, and that is mostly due to my major cleaning and organizing of the house. It was a long time over due, for sure!

I have been trying this recipe in my head for the past few weeks, and have finally decided to try it out. I love bread in almost any shape and form, and since I make all bread in our household, I end up slicing a piece and having it for breakfast with a slab of butter…this repeated over time is not the healthiest way to go. So, I set out to make a breakfast bread. Yes, I realize there is sugar in it, but hey! What is breakfast now days if it isn’t made with some sugar?!?  Might as well make it homemade without preservatives and chemicals, and make it mostly whole grains!

So here we go:IMG_0865

Ingredients: honey, active dry yeast, salt, unsweetened apple sauce, warm water, chia seeds, unbleached white whole grain stone ground flour, unbleached AP flour, rolled oats, cinnamon sugar, chopped pecans (or nut of choice).

IMG_0866

Mix 1/4 cup honey, 3/4 Tbs yeast, 1 1/6 cup luke warm water, 2 Tbs warm apple sauce, 2 Tbs Chia Seeds (optional), 1 1/4 tsp salt. Mix for 3 minutes.

IMG_0868

Add 1 cup white flour, 1 1/4 cup whole wheat, 3/4 cup pureed oats, 1/2 cup whole oats. Mix until well combined.

IMG_0869

Continue to mix on medium speed for approximately 3-4 minutes until batter remains sticky and very glutenous =)

Cover with plastic wrap or a wet tea towel and let rise for 45min to an hour.

IMG_0871

On a well floured surface, press dough out into a rectangle. Now here is the fun part. You can customize this however you want!  It’s your time to shine and to make it something you can personally brag about =) But here is what I did.

IMG_0872

Take your chopped pecans (or your choice of nut), and press them into the dough.

IMG_0873

Next, sprinkle the cinnamon sugar (ratio to make your own is 1:3 cinnamon to sugar). However much or little you want.

IMG_0874

Roll up the dough.

IMG_0875

Place it into a greased pan and let rise for 40 minutes. Preheat oven to 350 degrees while 15 minutes still left of rising.

IMG_0877

This is after it has risen. Place in oven and bake for 35-40 minutes.

IMG_0879

after it has been baked, let cool completely on wrack

IMG_0880

Showing you my idiotic mistake. Make sure you put it in the pan with the end of the roll on the bottom, or else it will look like this 😉

IMG_0882

Once it has cooled, dig in! It’s really yummy!!! No butter needed.

This is a dense bread, so a little will fill you up quickly (thankfully!)
I hope you enjoy this! Let me know what you think and/or alterations you did to improve the taste and to make it uniquely yours!

Pizza time!

I have never been a big fan of ‘fast-food’ pizza, especially after I worked at Pump It Up (the inflatable party zone!) for awhile in college. That is all we were allowed to serve and nothing against Papa John’s, but after you have served hundreds of cheese, pepperoni, sausage, etc pizzas and for the most part were given the left overs by the parents who didn’t want to take it home, it would be to soon if I ever ate a fast-food pizza again!

But I do love pizza, homemade that is. Andrew and I have had pizzas on Pillsbury rolls, whole wheat pitas, subs….but tonight we are having a different kind. One that is completely homemade (except the cheese and I found a simple mozzarella cheese recipe, but can’t find cheese salt, citric acid, or rennet tablets anywhere in our small town).

I mixed and matched recipes to make the entire pizza using other peoples ideas from their blogs and websites so I will give you the links:

For the idea of the pizza, I used the recipe from A Journey to Becoming: Homemade Pizza 

From there I was sent to The Frugal Girl: Wednesday Baking-Whole Wheat Bread where I made the whole recipe, but then made half the dough into the pizza crust and the other half into a loaf of bread (oh my word, her bread is sooo much yummier than the one I have been making!).

And for the sauce, I used my own recipe from my Spicy (or not) Tomato Sauce for Everything

Okay, now that you have all those links, here is how mine turned out.

IMG_0656

This is before I baked it.

IMG_0657

And this is after! YUM! my crust is that dark because I was really bad and brushed it with garlic butter before baking it…shhh!

In case you are wondering what I put on it, well, I used the sauce I told you about, then I sliced up tomatoes, sauteed onions and spinach in olive oil and garlic, then sauteed mushrooms in red wine, then topped it with pine nuts and cheese.

As I made the pizza, I kept sending pictures to my hubby to tease him about dinner 😉

~3 Minute Salsa~

We usually end up having a form of tacos or some Mexican or Cuban dish every week. After many trials and taste tests, I finally came up with a winning combination of flavors.

Andrew and I will sit down to watch a movie, and instead of popcorn, I will get chips (yes I know that is the unhealthy part)  and homemade salsa and eat the entire jar during the movie! But, you know? I don’t feel badly about doing that. I would much rather my family eat salsa instead of ice cream or cookies, etc. Don’t get me wrong, on occasion we will eat those items and love it, but when we have probably 2 movie nights a week in the winter, I much prefer us to eat salsa.

Anyhow, we eat this salsa, weather it be for a snack, or with our Mexican or Cuban meals every week.

The best thing about this salsa (besides it being so tasty and no preservatives) is it takes only about 3 minutes to make! and it makes almost an entire quart [4cups]! Can it get any better than that? =)

So here it is:

IMG_0604

You will need, a 28 oz can of tomatoes, salt, pepper, sugar, onion, garlic (or garlic powder), lemon juice, and jalapenos.

IMG_0605

In a food processor, dump can of tomatoes, 2 tsp salt, 1/2 tsp pepper, 1 tsp sugar, about 1/2 Tbs minced garlic (or you can do 1 tsp garlic powder), 3 tsp lemon juice, and a half of a medium onion. Blend very well.

IMG_0606

Now that you have blended it very well, add your spice! Most of the time, like this time, I don’t make it too hot. Which equals out to be about 6 slices of pickled jalapenos, but we do LOVE hot things so sometimes I will put about 10 slices or more in. All depend on your taste.

IMG_0612

And then you have your product! Simple, quick, easy, and delicious!

~3 Minute Salsa~

Makes about 1 quart [4 cups]

Ingredients:

–          1, 28oz can of tomatoes

–          2 tsp salt

–          ½ tsp pepper

–          1 tsp sugar

–          3 tsp lemon juice

–          ½ medium onion

–          ½ Tbs minced garlic OR 1tsp garlic powder

–          Jalapenos to taste

Directions:

Add all ingredients except for jalapenos in a blender and blend well. Taste to make sure seasoned enough, then add jalapenos and blend to taste.

~Nothin’ Better than Homemade Crusty Bread~

I LOVE bread in just about any form. I am a carbohydrate junky! But since we switched to a whole food diet, I realized that a lot of breads were not as they appeared. My momma would make bread on occasions growing up, and I could eat an entire loaf by myself! (will have to get her recipe and post it here too)

Now, as a married woman and mother, I decided that I want to make my own bread again. That way I know what is going in it and I can make sure all the nutrients are there and haven’t been bleached out. I was looking at Pinterest for some bread recipes, and stumbled upon an AMAZING recipe that is so simple but so good!

And you want to know what? There are only FOUR ingredients in it! Crazy, I know: yeast, water, salt, flour. That is all! Here is the link to where I got it, but I modified it (a.k.a. halved it and made it into a loaf) to make it work for my family.

Here we go…

IMG_0545List of ingredients: 1 1/2 cups luke-warm water, 3/4 Tbs active dry yeast, 3/4 Tbs salt, 3 1/4 cup unbleached bread flour (or unbleached all-purpose flour).

IMG_0547

Mix water, salt, yeast together in a mixing bowl and let set for about 20 minutes.

IMG_0548

You can do this by hand, but my lovely sister bought me this KitchenAid mixer, in my favorite color, and so I mix the bread in it =)

IMG_0549

After the initial 20 minutes, add the flour.

IMG_0550

Mix just until wet (so no dry ingredients visible). I usually have to add just a little bit of water to get it to a dough consistency.

IMG_0551

Now cover the bowl in plastic wrap and let rise for 2 hours.

IMG_0552

This is what it will look like after two hours.

IMG_0553

Grease a bread baking dish and set aside.

IMG_0554

 Flour your hands and pick up the dough and form into an oval bread shape (Haven’t a clue what else to call it). Don’t kneed it, just form into shape then place into greased pan.

IMG_0555

Allow to rise for another hour. 45 minutes into rising, make your slashes in the top.
About 1/4 inch deep.

IMG_0556

Also, 45 minutes into the rising, place a metal lipped pan into the oven and preheat oven to 450 degrees.

(Can’t really take a picture of this part) After it has risen for an hour, place into oven. Take a cup of hot water, pour into metal lipped pan in the oven and close the door very quickly. This traps the steam in the oven and allows the bread to have a nice steam bath. Bake for 30 minutes.

IMG_0560

Here you go! Delicious bread that is perfect for sandwiches or just plain butter, jam, apple butter, etc. It is AMAZING! My hubby, loves it too and takes at least a slice to work every day no matter if he is having a sandwich or not.

Hope you enjoy it as much as we do!